使用 matplotlib 的 animation 让数据动起来
最近在研究排序算法,为了更好的展示排序过程,决定使用动画演示,专门研究了 python 图表库 matplotlib 的 animation。本文简单讲一下如何使用 matplotlib 让你手中的数据动起来。
Animated line plot
废话不多说,以 matplotlib 官方给的 🌰 (Animated line plot)说明基本的使用。
示例代码
import numpy as np
import matplotlib.pyplot as plt
import matplotlib.animation as animation

fig, ax = plt.subplots()

x = np.arange(0, 2*np.pi, 0.01)
line, = ax.plot(x, np.sin(x))


def init():  # only required for blitting to give a clean slate.
    line.set_ydata([np.nan] * len(x))
    return line,


def animate(i):
    line.set_ydata(np.sin(x + i / 100))  # update the data.
    return line,


ani = animation.FuncAnimation(
    fig, animate, init_func=init, interval=2, blit=True, save_count=50)

# To save the animation, use e.g.
#
# ani.save("movie.mp4")
#
# or
#
# from matplotlib.animation import FFMpegWriter
# writer = FFMpegWriter(fps=15, metadata=dict(artist='Me'), bitrate=1800)
# ani.save("movie.mp4", writer=writer)

plt.show()
运行结果
上面的视频是由上面的代码生成,不过需要将以下代码(即30~32行)取消注释:
from matplotlib.animation import FFMpegWriter
writer = FFMpegWriter(fps=15, metadata=dict(artist='Me'), bitrate=1800)
ani.save("movie.mp4", writer=writer)
如果系统没有安装 ffmpeg 运行代码可能会提示以下错误:
… FileNotFoundError: [Errno 2] No such file or directory: ‘ffmpeg’: ‘ffmpeg’
所以需要安装 ffmpeg,十里使用的是 macOS,所以通过以下命令进行安装:
$ brew install ffmpeg
其它系统可以下载 ffmpeg 官网 提供的安装包进行安装。
代码分析
理解代码的关键三点:
- 获取图像
fig和 坐标轴对象ax:fig, ax = plt.subplots() - 定义初始化函数
init和数据更新函数animate:- 初始化函数,用于动画的初始化操作,这个可以不用为可选定义
- 数据更新函数,用于告知 animation 更新操作,这个函数的参数默认传入的是帧序号,但是如果
animation.FuncAnimation方法指定可选参数frames为一个列表的话,更新函数调用时传入的值会是相应索引下的元素,此时动画终点就是取完列表元素,如果不指定frames则会一直传入帧序号保持下去。
- 调用
animation.FuncAnimation方法:- 第一个参数传入图像对象,这里是
fig - 第二个参数默认为更新函数,这里是
animate - 可选参数
init_func,指定初始化函数 - 可选参数
interval,指定帧间隔时间单位 ms - 可选参数
frames,指定更新序列,如果是个整数,则指定的是总的帧数 - 可选参数
save_count,指定保存动画(gif或mp4)的帧数 - 可选参数
repeat,指定是否循环动画 - 可选参数
blit,指定是否优化绘图
- 第一个参数传入图像对象,这里是
动画保存
运行结果 中说明了保存 mp4 的方法,这里说一下如何保存 gif。
ani 的 save 方法可以指定 writer ,这里要保存 gif 默认选择的 writer 为 pillow ,所以需要安装 pillow 库:
$ pip3 install pillow
按照如下调用方法即可保存动画为 gif,这里保存动画的帧数是受 animation.FuncAnimation 的 frames 和 save_count 影响的:
ani.save('animation.gif', writer='pillow')
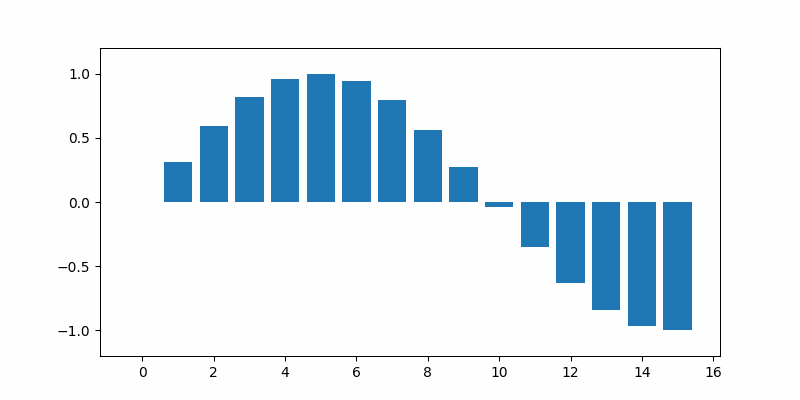
柱状图动起来
直接上代码,比着葫芦画瓢 让你的柱状图舞动起来吧:
import numpy as np
from matplotlib import animation
from matplotlib import pyplot as plt

fig = plt.figure(figsize=(8, 4))

x = [i for i in range(16)]

data = [[np.sin(d/np.pi+i/50*np.pi) for d in x] for i in range(100)]
rects = plt.bar(x, data[0])
plt.ylim(-1.2, 1.2)

def animate(i):
    for rect, yi in zip(rects, data[i]):
        rect.set_height(yi)
    return rects

anim = animation.FuncAnimation(fig, animate, frames=len(data), interval=40)
# anim.save('bar.gif', writer='pillow')
plt.show()