爬虫实践之hexo博客分析
爬虫最好处理的就是静态页面,而静态博客就是静态页面,像jekyll和hexo生成的博客就属于这一类型。本文将记录针对hexo博客中博文的爬取和统计以及博文中图片的批量爬取。
我们知道hexo博客系统生成的博客,大量依赖主题模板,所以对于页面内容的解析一定更有规律可循,虽然不同主题之间存在差异,但是一定存在通用的方法可以针对所有hexo博客。
平台说明
- 操作系统:macOS 10.13.5
- 浏览器:safari
- python版本:python3.6.5
- python库管理工具:pip3
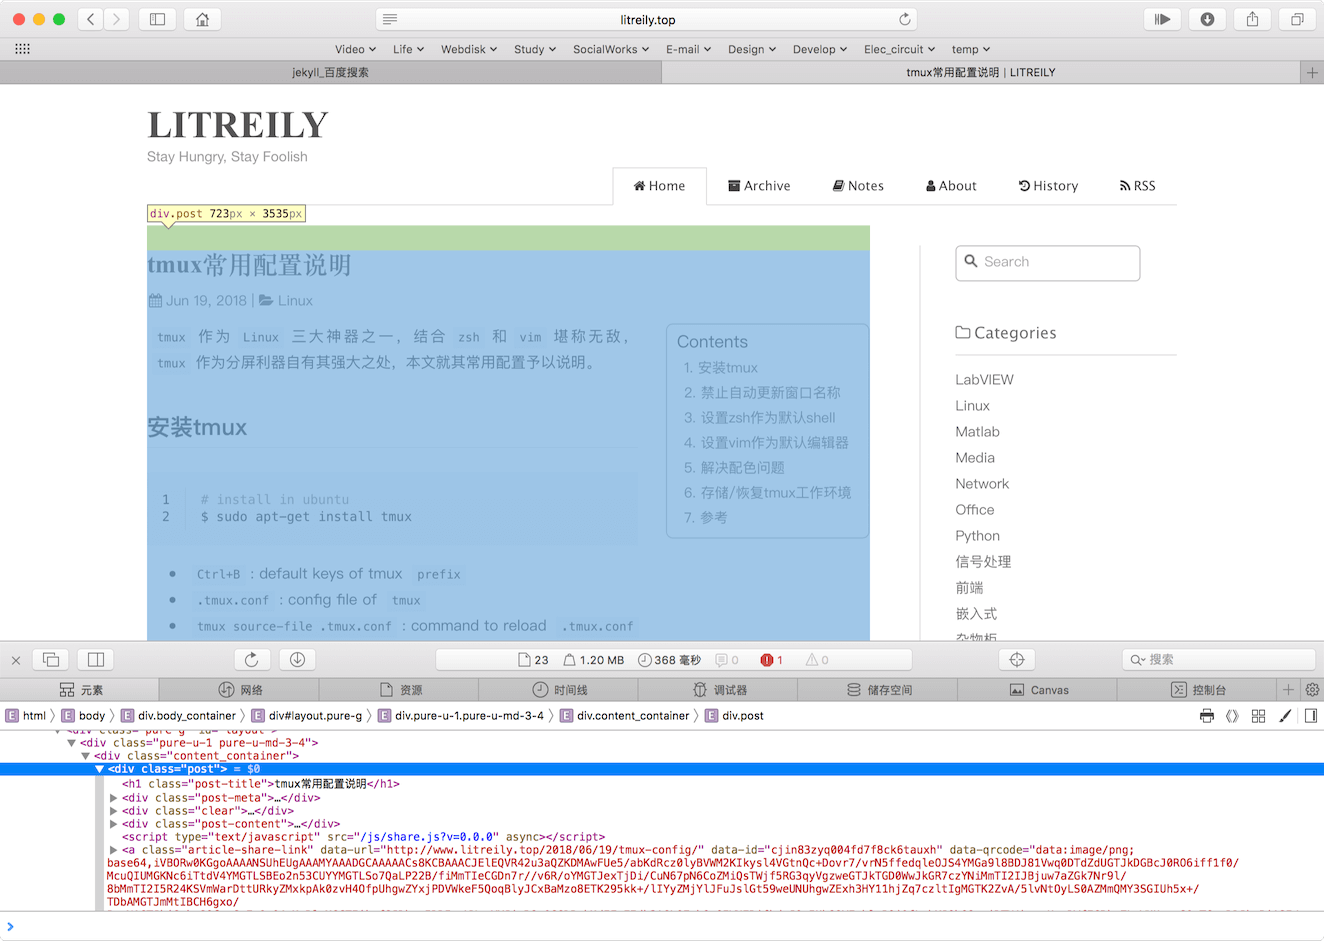
其它平台思路一致,只是工具使用有略微差别,大部分用户可能使用chrome分析页面,其实safari和chrome分析页面的过程一样,检查窗口布局稍有不同而已,但是macOS下都可以通过command+option+i调出这个开发用的窗口。
这里需要注意的是,默认safari是打不开页面元素检查窗口的,需要设置一下:
- 打开
偏好设置,调到高级标签页;- 勾选
在菜单栏显示"开发"菜单,勾选成功后,菜单栏会多出开发项
目标
本文中爬虫应用的目标是分析hexo博客中博主每月发布文章的数量,并绘制相关柱状图,以及爬取每篇文章里的图片。
分析
可以发现hexo博客系统中存在page这种属性的页面,其中会有个archive(也就是归档)的页面,在这个页面中是整个博客中按照年份整理的博文列表,比如十里的好友LITREILY的归档页面http://www.litreily.top/archives/:

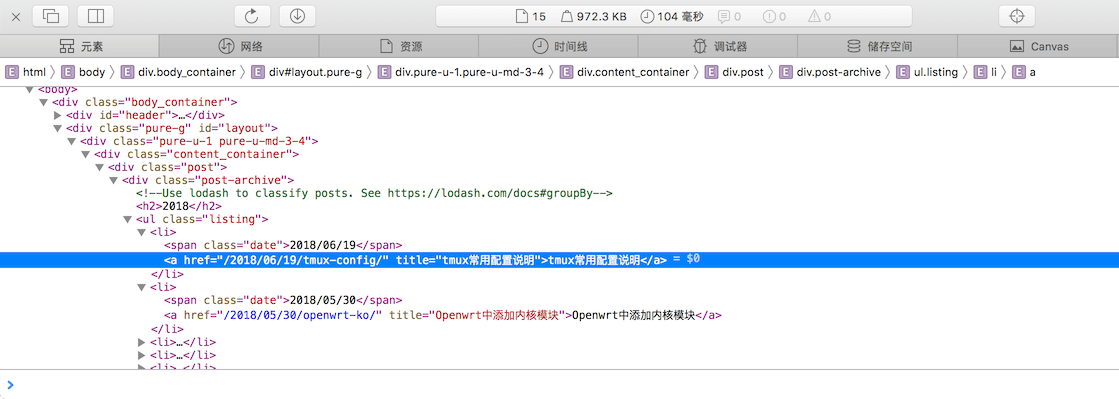
可以看到页面中博文列表中的元素,包含博文标题、链接,而链接中包含了日期信息。所以分析这个页面中数据就能得到博文的具体信息:
- 博文标题
- 博文链接
- 博文日期
有了上面的信息就可以按时间统计博文了,同时可以访问博文链接,因为模板的原因,每篇博文DOM树一定是一样的,所以就可以先找到博文内容部分的节点,然后在节点中找img节点就可以了,这样就能获取图片的链接了img节点的src属性内容。

实现思路设计
过程
requests库获取指定归档地址页面内容,利用pyquery库根据指定CSS选择器得到的博文列表信息,返回结果是字典,包含博客标题和博文列表,博文列表的元素为每个博文的信息,包含:- 标题
- 链接(根据
pyquery解析的不完整链接与urllib.parse工具配合合成完整博文链接) - 日期
- 根据第1步返回的数据统计自博客创建来每个月博文发表数量,返回相应统计的字典数据;
- 根据第2步中的返回结果,利用
matplotlib的pyplot绘制统计图; - 根据第1步中获取的博文列表数据,
requests库访问博文链接,pyquery解析img节点,获取图片链接信息,最终形成图片信息列表,作为结果返回; - 根据第4步结果,访问图片链接获取图片二进制内容,利用
hashlib的md5生成图片名称,利用os库检查并创建以博文标题命名的目录,将图片按照生成图片名称保存到相应的目录中。
形式
按照文章 爬虫实践之头条狗狗图片 通用化脚本小节描述的,将脚本做成一命令行工具形式使用的方式,工具分为两个子命令:统计博客活跃度子命令和爬取博客内图片的命令。
同时命令还需传入博客归档页面地址和页面中博文列表元素的CSS选择器,大概的调用形式:
- 爬虫脚本名 子命令 归档页面地址 博文链接CSS选择器
而命令形式下,命令参数的获取需要使用sys库。
python库
根据上述内容描述,程序会依赖下面这些库:
requestspyqueryurllibmatplotlibhashlibossys
$ pip3 list
上述命令查看安装的包,没有安装的python库通过pip3安装即可。
代码实现
导入所需库
import os
import sys
import requests
from hashlib import md5
import urllib.parse as up
import matplotlib.pyplot as plt
from pyquery import PyQuery as pq
获取博文列表
根据小节过程中第一步的描述,获取博客文章列表,封装为一个方法get_blog_posts,需要传入两个参数:
- 博客归档网址
- 选择页面中博文条目对应的
<a>标签
def get_blog_posts(url, css_selector):
    '''获取博客文章列表
    :param url: 博客的归档页面地址
    :type url: 字符串
    :param css_selector: 用于选择文章条目对应<a>标签的CSS选择器
    :type css_selector: 字符串
    :return archive: 一个包含博客名称和博文列表的字典,博文列表包含标题、链接和日期信息
    :rtype: dict
    '''
    try:
        response = requests.get(url, headers=HEADERS)
        if response.status_code == 200:
            url_p = up.urlparse(url)
            host_url = '{0}://{1}'.format(url_p.scheme, url_p.netloc)
            doc = pq(response.content)
            archive = {
                'name': doc('head title').text().split('|')[1].strip(),
                'posts': []
            }
            for post in doc(css_selector).items():
                article = {
                    'title': post.text(),
                    'url': ''.join([host_url, post.attr.href]),
                    'date': post.attr.href[1:11]
                }
                archive['posts'].append(article)
            return archive
    except requests.ConnectionError:
        print('网络链接异常!请重试!')
        sys.exit(-1)
比如对于上面提到的http://www.litreily.top/archives/ 可以用浏览器查看一下元素:

那么可以使用以下CSS选择器进行节点的查询:
‘.post-archive .listing li a’
可以这样调用函数获取博文列表:
get_blog_posts('http://www.litreily.top/archives', '.post-archive .listing li a')
统计博文
根据上一步得到的博文列表统计每年的每个月份发表博文数量,结果为字典数据,最外层键为年份,指为一个字典,这个字典以月份作为键,值为对应月份的博客数量:
- 生成空列表;
- 查询一个博文信息中日期信息,根据年份判断字典中有无对应键,若没有添加新键,初始化值为字典,该字典以12个月份对应数字字符串为键,值初始化为0;
- 根据博文日期的月份为,对应键的值+1;
- 一直重复2、3步,知道列表中所有博客查询一遍;
- 返回统计结果;
具体实现:
def statistic_posts_by_date(posts):
    '''按照日期对博文分类统计文章个数
    :param posts: 博文列表,每个元素包含标题、链接和日期信息
    :type posts: list
    :return statistics: 按照年份月份统一文章个数
    :rtype statistics: dict
    '''
    statistics = {}
    months = ['%02d'%x for x in range(1, 13)]
    for post in posts:
        year, month, day = post['date'].split('/')
        if statistics.get(year) == None:
            statistics[year] = {}
            for month_key in months:
                statistics[year][month_key] = 0
        statistics[year][month] += 1
    return statistics
绘制统计图
这一步利用matplotlib库绘制,使用 subplot方法,默认绘制两列,行数根据博客中年份的数量决定,每年绘制一个子图,子图横坐标设置为月份,以柱状图的形式呈现,为了更好呈现对比,每个子图纵坐标设置大小限制,图中绘制相应月份的数量数值:
def plot_statistics(statistics, title='posts yearly'):
    '''根据统计数据绘制曲线图
    :param statistics: 博文按照日期的统计数据
    :type statistics: dict
    :param title: 曲线图标题
    :type title: 字符串
    '''
    count = len(statistics)
    plt.close('all')
    plt.figure(figsize=(12, count * 2))
    plt.suptitle(title)
    row = count // 2 + 1
    sub_n = 1
    for year, data in statistics.items():
        plt.subplot(row, 2, sub_n)
        sub_n += 1
        x = range(len(data))
        plt.bar(x, data.values(), label=year)
        for a,b in zip(x, data.values()):
            plt.text(a, b+0.05, '%d' % b, ha='center', va= 'bottom',fontsize=7)
        plt.xticks(x, data.keys())
        plt.xlabel('Month')
        plt.ylabel('Count of posts')
        plt.ylim(0, 15)
        plt.legend()
    plt.show()
获取博文中图片信息
主要获取图片的链接,首先遍历博文列表,访问每个博文链接,获取页面内容,解析得到文章主体内容部分,再从内容中提取img节点,节点的src属性就是链接,如果是博客内的图片,链接会是相对路径,并不是完整的,需要填充博客主页网址组成完整地址:
def get_post_content(post):
    '''获取指定博文的内容
    :param post: 博文
    :type post: dict
    :return post_content: 访问链接中博文内容部分的PyQuery对象
    :rtype: PyQuery
    '''
    url = post['url']
    try:
        response = requests.get(url, headers=HEADERS)
        if response.status_code == 200:
            doc = pq(response.content)
            return doc('.post')
        else:
            print('异常,状态码:', response.status_code)
    except requests.ConnectionError:
        print('\n异常...', post['title'], url, '\n')

def get_post_images(posts):
    '''获取博文列表中博文中所有图片的链接
    :param posts: 博文列表,每个元素包含博文标题、链接和日期
    :type posts: list
    :return images: image信息,包含所属博文标题、图片链接
    :rtype: dict
    '''
    for post in posts:
        post_content = get_post_content(post)
        if post_content:
            images = post_content.find('img').items()
            url_p = up.urlparse(post['url'])
            host_url = '{0}://{1}'.format(url_p.scheme, url_p.netloc)
            for image in images:
                image_url = image.attr.src
                if image_url[0] == '/':
                    image_url = host_url + image_url
                yield {
                    'title': post['title'],
                    'image': image_url
                }
保存图片
根据传入的图片信息中的链接获取图片内容,再根据内容生成图片名称,将图片保存在指定目录下对应的博文名称命名的文件夹中,实现过程与文章 爬虫实践之头条狗狗图片 中保存图片的思路一致:
def save_image_from(image_info, to_dir=''):
    '''根据链接获取图片,保存到标题命名的目录中,图片以md5码命名
    :param image_info: 包含标题和链接信息的字典数据
    :type image_info: dict
    :param to_dir: 要保存到的目录,默认值是空字符串,可指定目录,格式如: '狗狗'
    :type to_dir: unicode 字符串
    '''
    if image_info:
        print(image_info)
        image_dir = to_dir + '/' + image_info['title']
        if not os.path.exists(image_dir):
            os.makedirs(image_dir)
        try:
            response = requests.get(image_info['image'])
            if response.status_code == 200:
                image_path = '{0}/{1}.{2}'.format(image_dir, md5(response.content).hexdigest(), 'jpg')
                print(image_path)
                if not os.path.exists(image_path):
                    with open(image_path, 'wb') as f:
                        f.write(response.content)
                    print('图片下载完成!')
                else:
                    print('图片已下载 -> ', image_path)
        except requests.ConnectionError as e:
            print('图片下载失败!')
        except:
            print('出现异常!')
命令参数解析
按照命令形式的方式构造脚本还需要对参数输入进行解析:
def parse_sys_args(args=sys.argv):
    '''解析命令参数
    '''
    help_info = '''\n    使用方法:
      %s 子命令 hexo博客归档地址 CSS选择器
      - 子命令:count 和 pic,count用于得到指定博客中每个月份博文数,pic用于爬取博文中的图片
      - hexo博客归档地址:比如http://www.litreily.top/archives/
      - CSS选择器:用于选择文章列表中文章标题对应的<a>标签
    举例:
      %s count http://www.litreily.top/archives/ '.post-archive .listing li a'
      %s pic http://www.smslit.top/archives/ '#posts article .post-title-link'

    ''' % (args[0], args[0], args[0])
    if len(args) != 4:
        print(help_info)
        sys.exit(-1)
    else:
        if args[1] != 'pic' and args[1] != 'count':
            print('请输入正确子命令!')
            print(help_info)
            sys.exit(-1)
        return (args[1], args[2], args[3])
主体执行过程
最后组织脚本,实现预期的功能,具体实现如下:
if __name__ == '__main__':
    command, url, css_selector = parse_sys_args()
    archive = get_blog_posts(url, css_selector)
    print(archive['name'], '一共有', len(archive['posts']), '篇博文!')
    if len(archive['posts']) > 0:
        if command == 'count':
            plot_statistics(statistic_posts_by_date(archive['posts']), archive['name']+'\'s posts yearly')
        else:
            for image in get_post_images(archive['posts']):
                save_image_from(image, archive['name'])
    else:
        print('没有发现博文,请确认您写的css选择器是否合理!')
至此完成脚本文件,在这里十里给文件的命名是:blogo。
测试功能
代码已经完成,分别测试两个子命令。
博文统计
执行命令:
$ ./blogo count http://www.litreily.top/archives/ '.post-archive .listing li a'
LITREILY 一共有 51 篇博文!
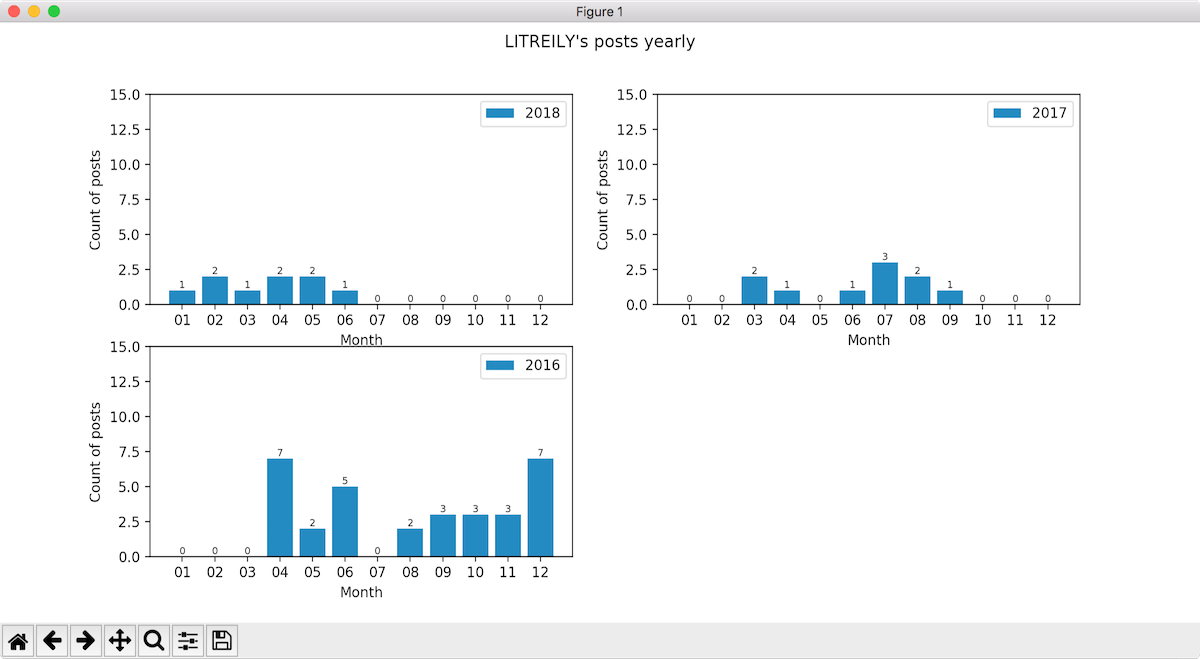
得到统计结果:

爬取博文图片
执行命令:
$ ./blogo pic http://www.litreily.top/archives/ '.post-archive .listing li a'
LITREILY 一共有 51 篇博文!
{'title': 'Python网络爬虫4 - scrapy入门', 'image': 'http://www.litreily.top/assets/spider/scrapy/scrapy.jpg'}
LITREILY/Python网络爬虫4 - scrapy入门/a9f6acf5b1893055a235b846caa3998e.jpg
图片下载完成!
{'title': 'Python网络爬虫3 - 生产者消费者模型爬取某金融网站数据', 'image': 'http://www.litreily.top/assets/spider/cfachina/home_page.png'}
LITREILY/Python网络爬虫3 - 生产者消费者模型爬取某金融网站数据/b911b25d568bef51de4e902c8e0fa725.jpg
图片下载完成!
{'title': 'Python网络爬虫3 - 生产者消费者模型爬取某金融网站数据', 'image': 'http://www.litreily.top/assets/spider/cfachina/personinfo.png'}
LITREILY/Python网络爬虫3 - 生产者消费者模型爬取某金融网站数据/9d598568290765c2fb19cc890d7e47d4.jpg
图片下载完成!
...
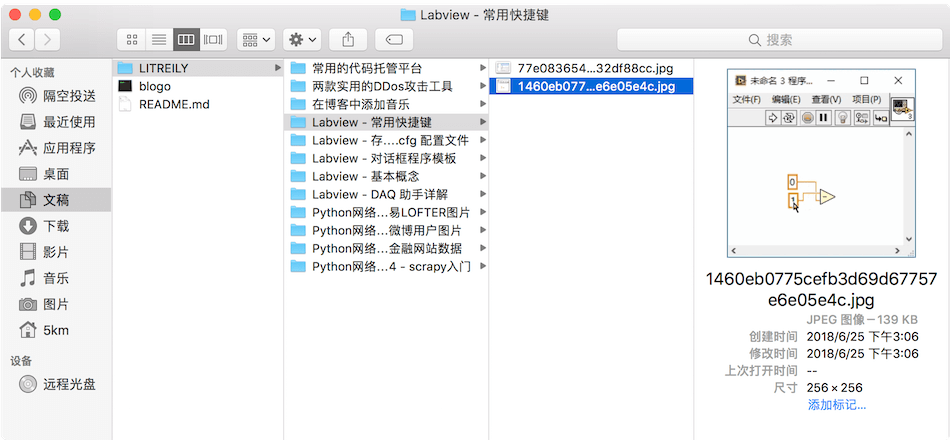
上面执行结果省略了大部分打印信息,执行完成后可以看到同级目录下出现了以博客名称命名的文件夹,里面的文件夹以博文标题命名,文件夹内存的就是相应博文的图片:

完整代码参考:blogo
能爬取hexo的每篇文章的访问量吗,我打开了网页的源代码,都是这种显示:
你好像用的是leancloud,我用的是不蒜子。。。
@暮雨
本文实现的只是对 html 内容的解析获取,像这种异步调用 js 实现对访问量请求然后修改节点的,需要了解一下不算子的请求 API ,然后使用python3的 requests 构造相应 HTTP 请求获取对应文章的访问量,思路就是这样的!本文没有实现这个功能!
v1.5.2