PlatformIO IDE(VSCode) - stm32cube 框架的工程
前些天知乎网友有问到 PIO 中 stm32 的 cubemx 框架工程中闪灯程序不能正常工作的问题,猜测可能是没有进行系统时钟配置导致的。本文就以 LED 闪烁为例讲一下如何新建一个 stm32cube 框架的工程,并且将 LED 点亮。
测试平台
- PlatformIO IDE (VSCode)
- stm32f103c8t6 最小系统板,板载 LED 连接在 PC13 管脚,低电平点亮
- stlink v2 仿真调试器
测试目标:创建 stm32cube 框架的工程项目,实现 LED 周期闪烁的代码
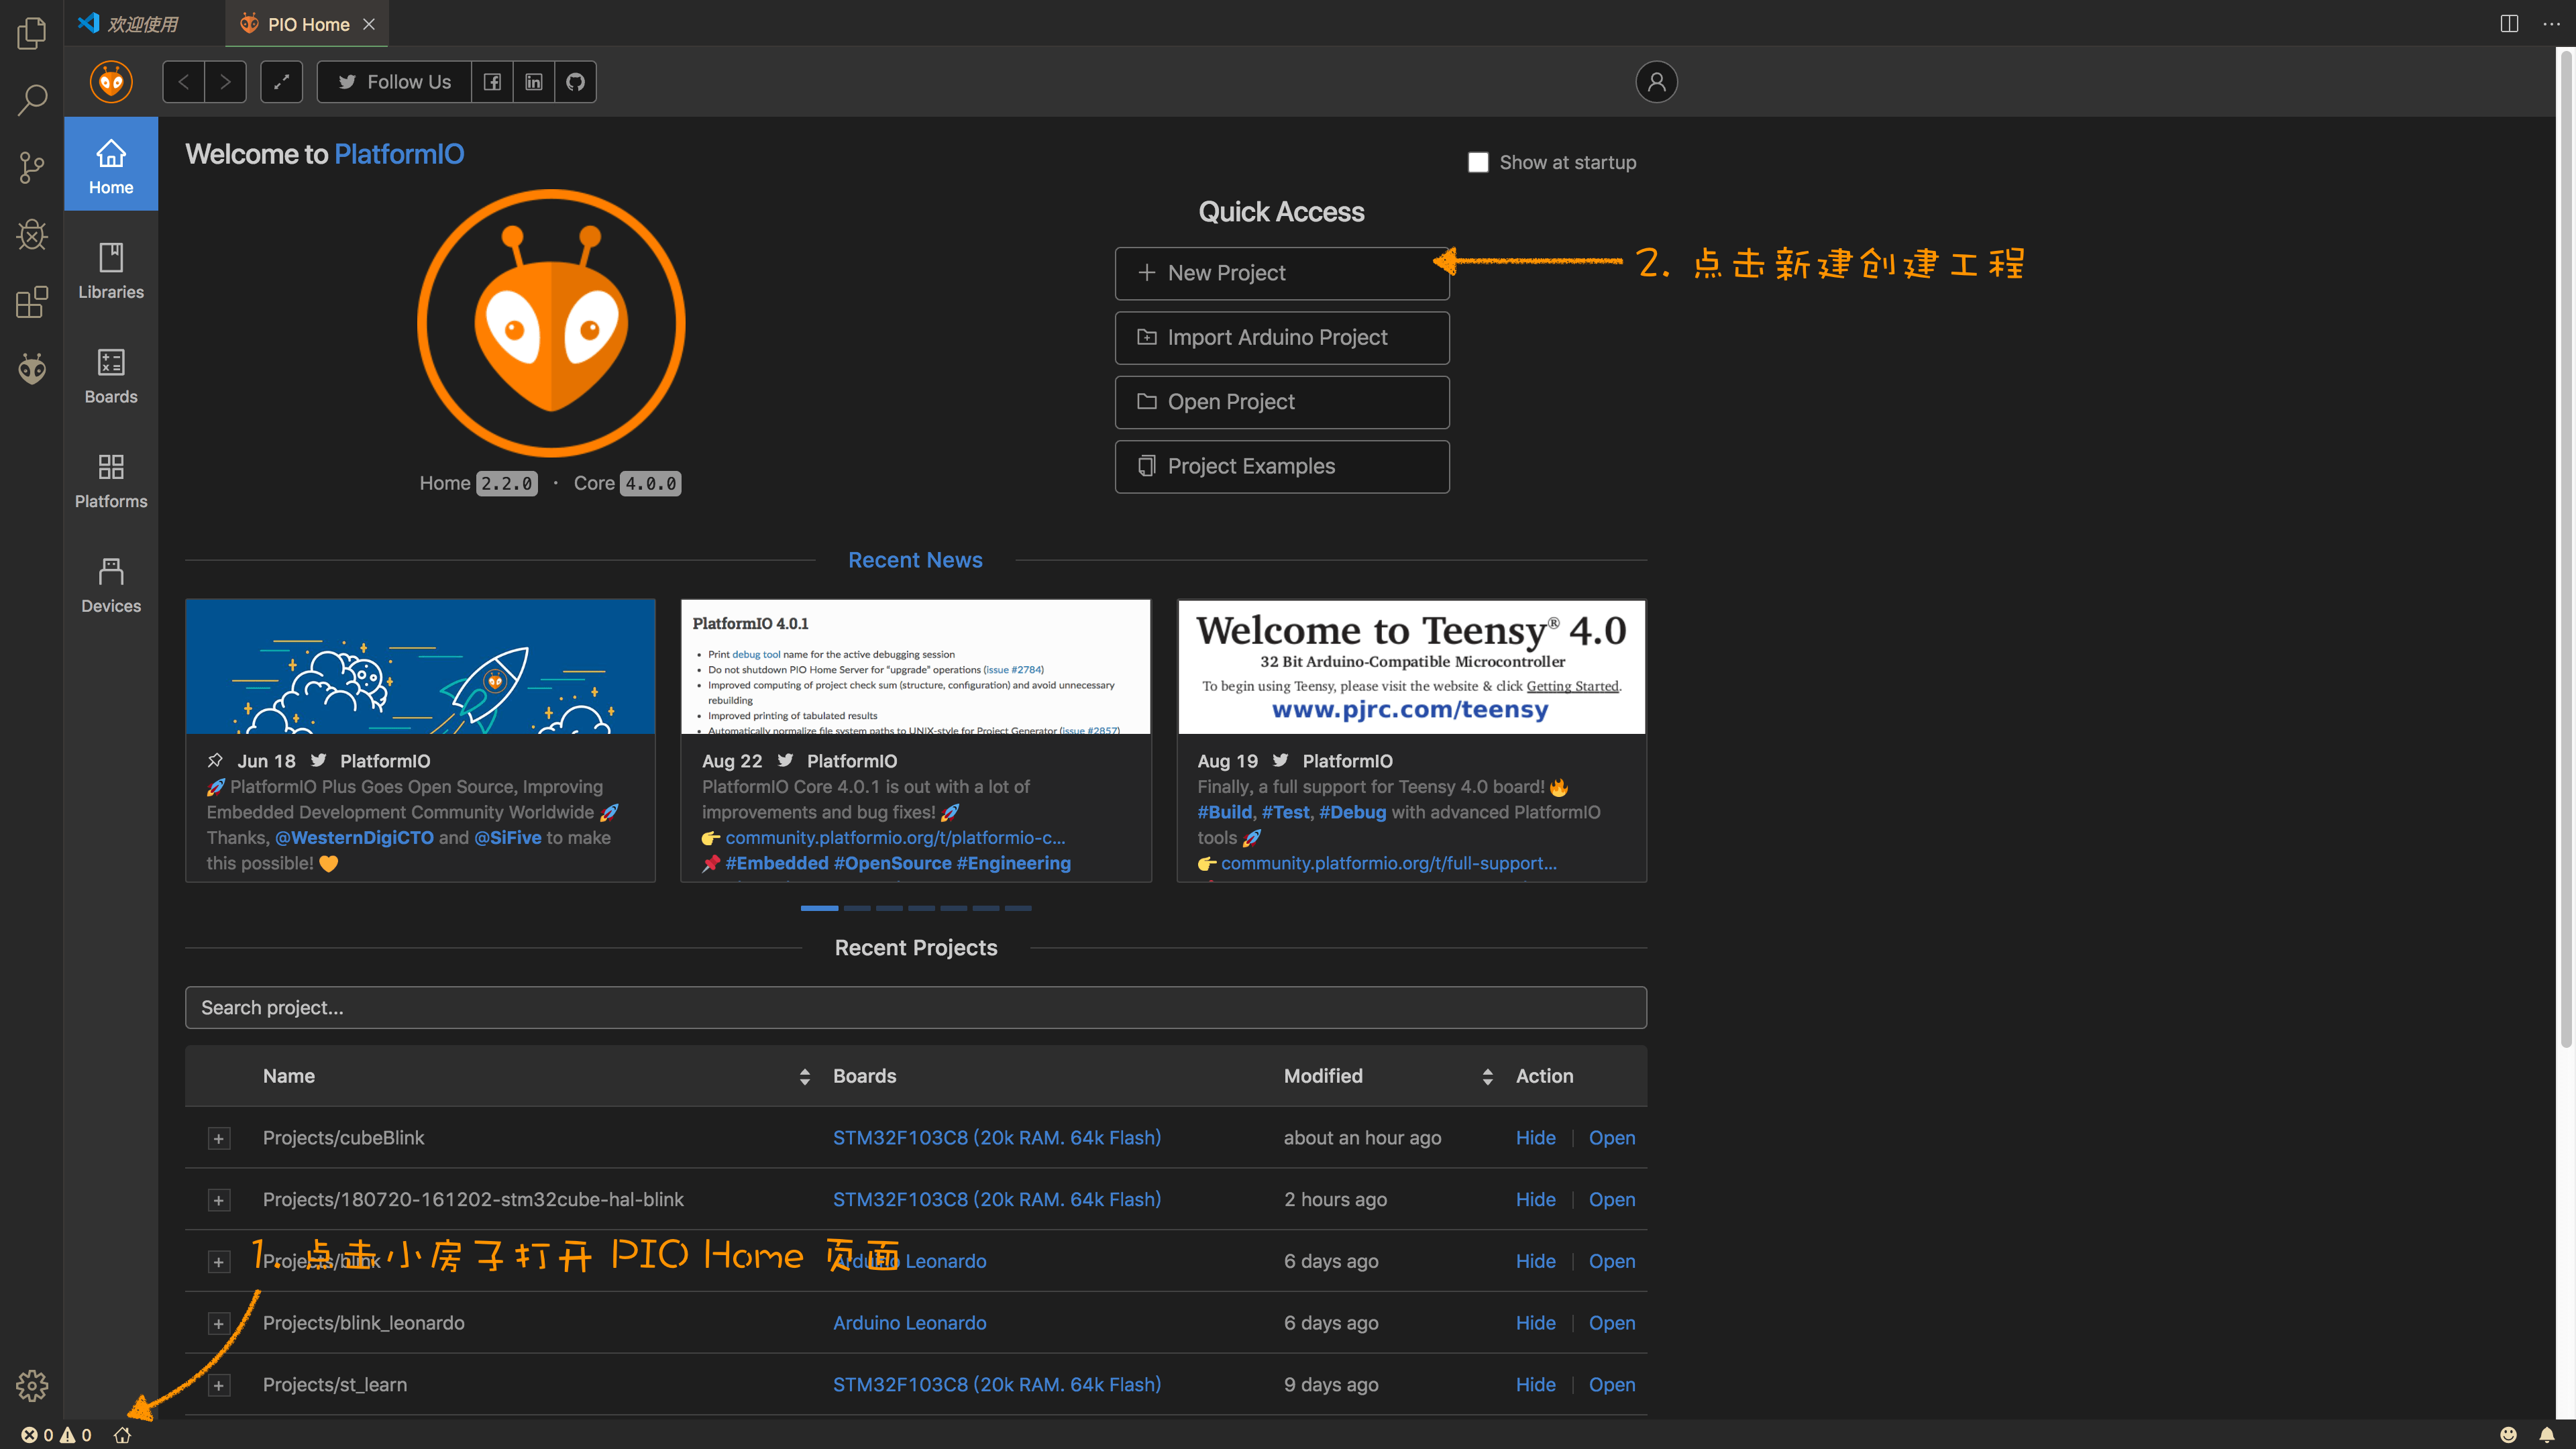
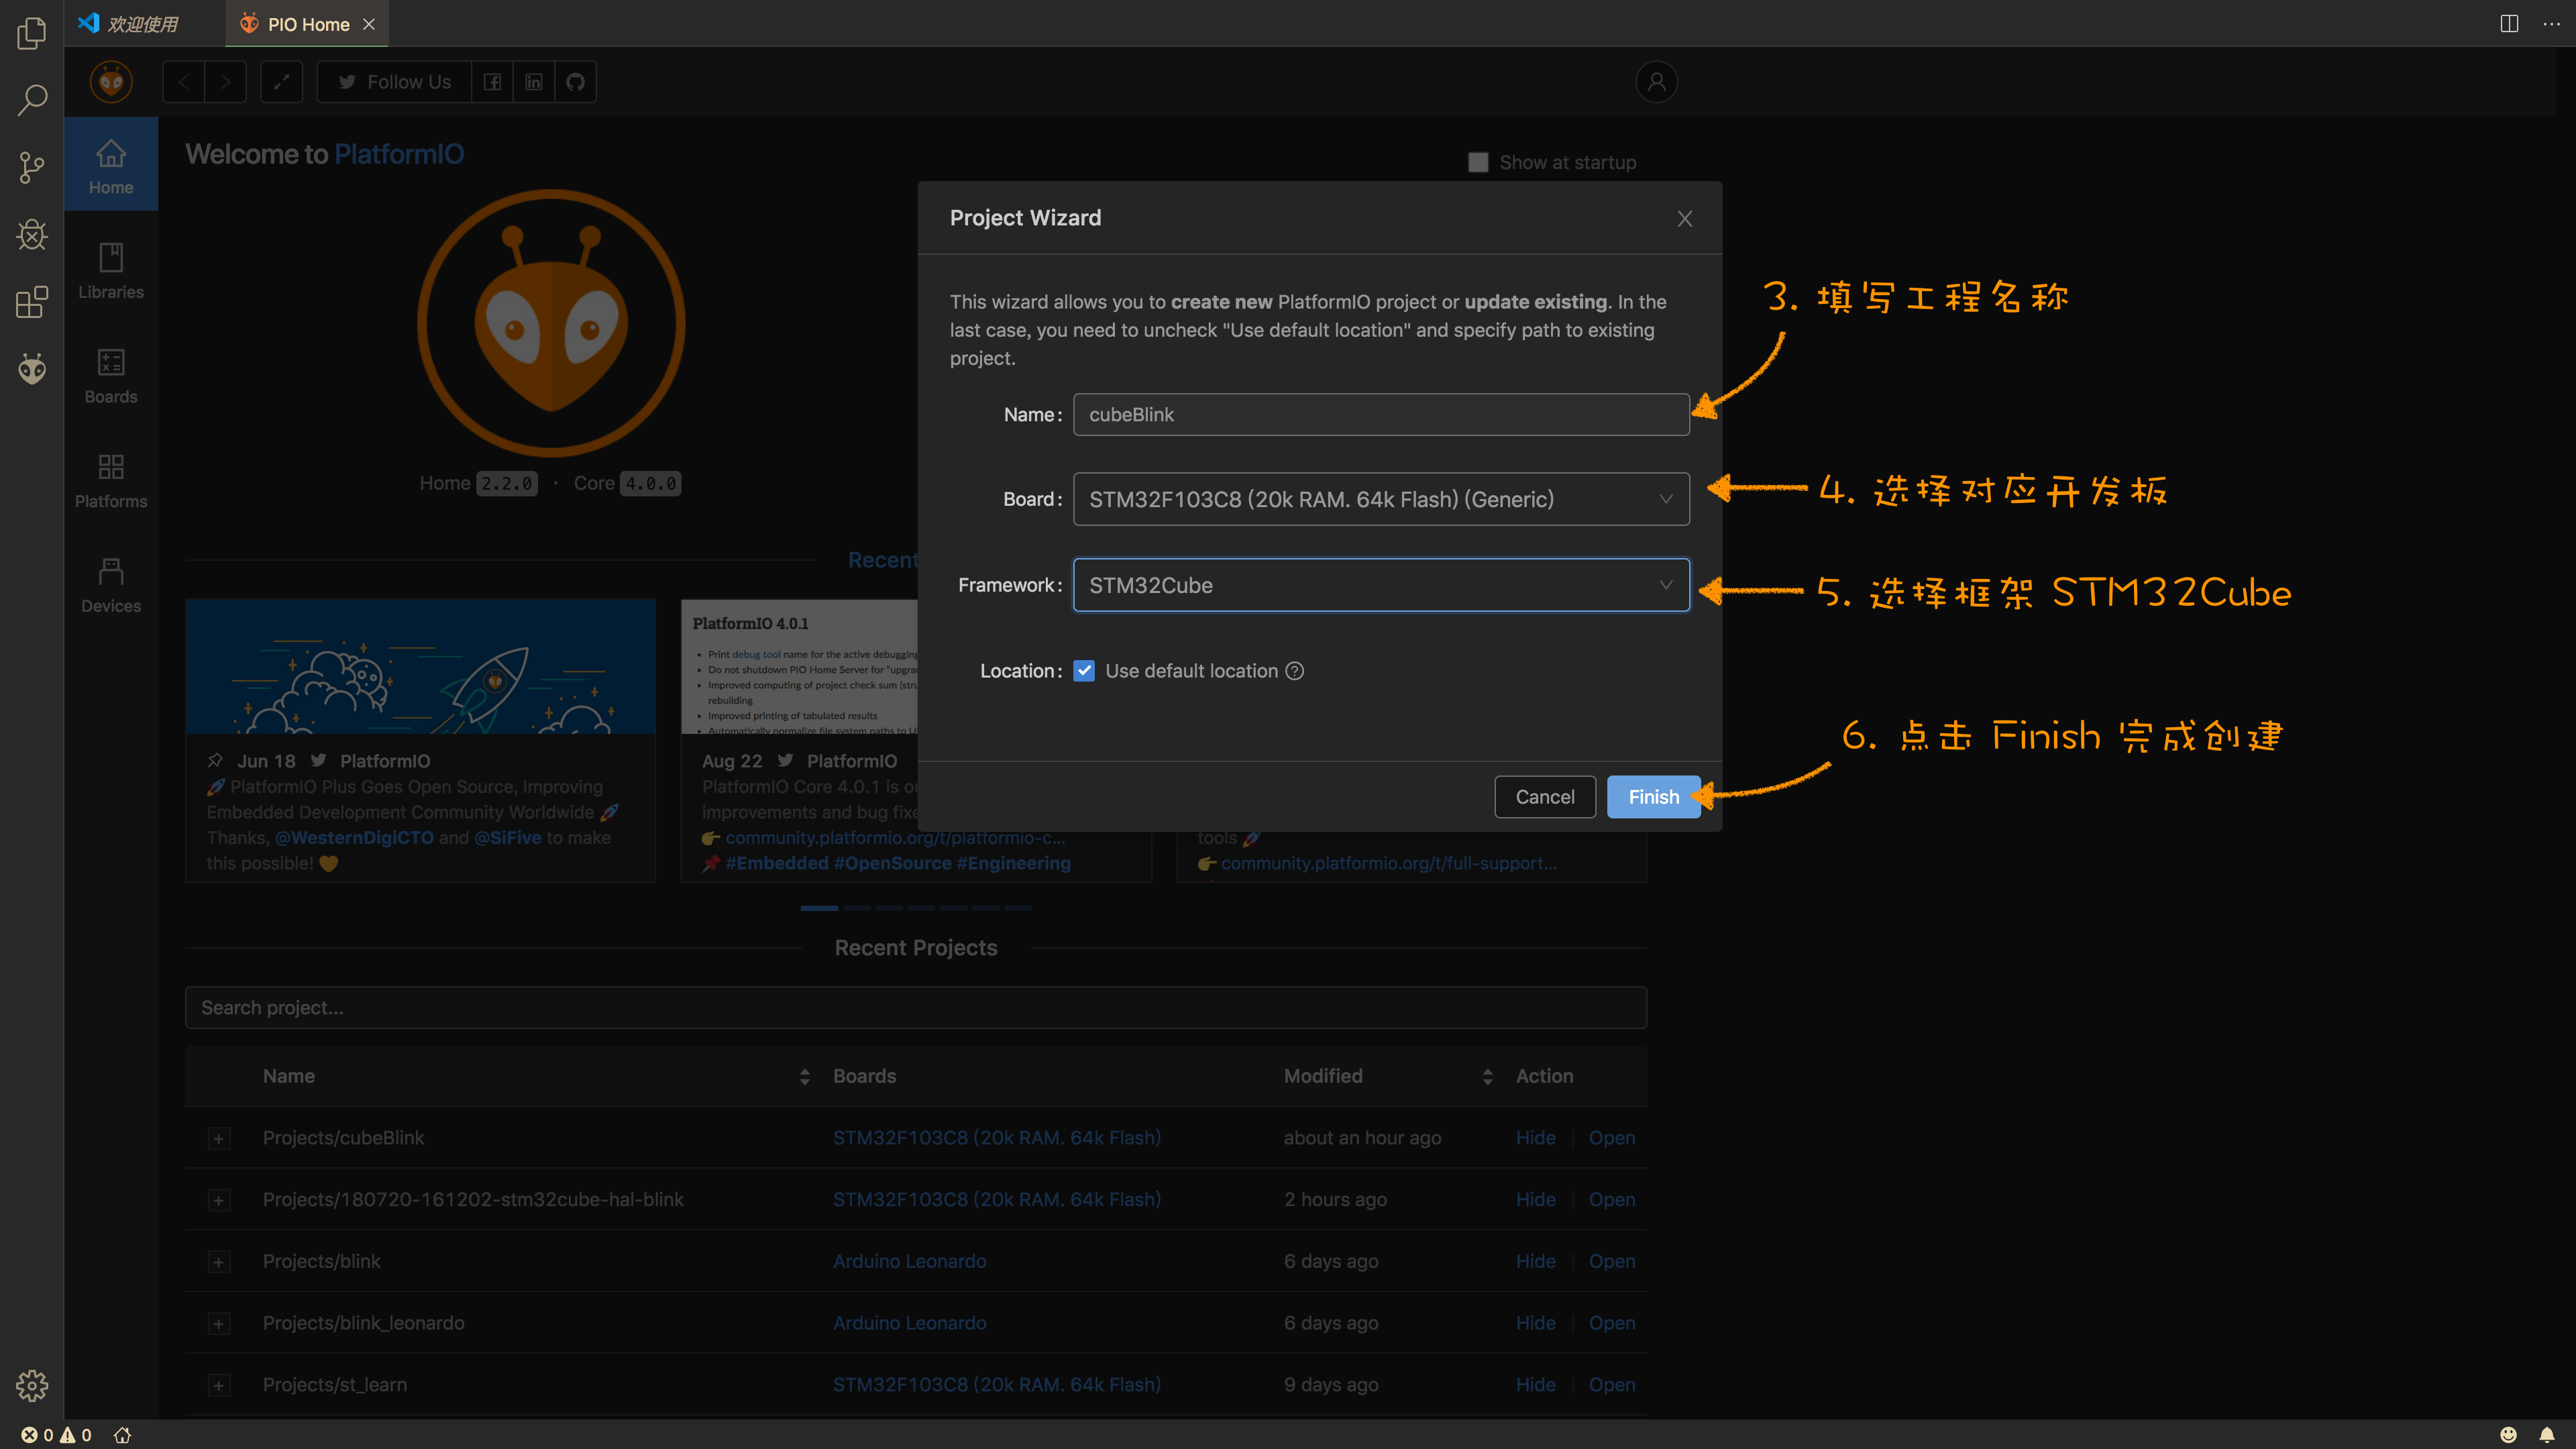
创建工程项目
这一步很简单,注意选择框架 stm32cube^[stm32cube 对应的就是 cubemx 库,详见STM32Cube],开发板选择 STM32F103C8(20k RAM. 64k Flash)(Generic),名称随便,最后点击创建即可:
添加例程代码
按照 STM32Cube HAL and Nucleo-F401RE: debugging and unit testing - Adding Code to the Generated Project ^[STM32Cube HAL and Nucleo-F401RE: debugging and unit testing] 描述的过程添加适合自己开发板的代码(修改对应的 LED 管脚即可)。
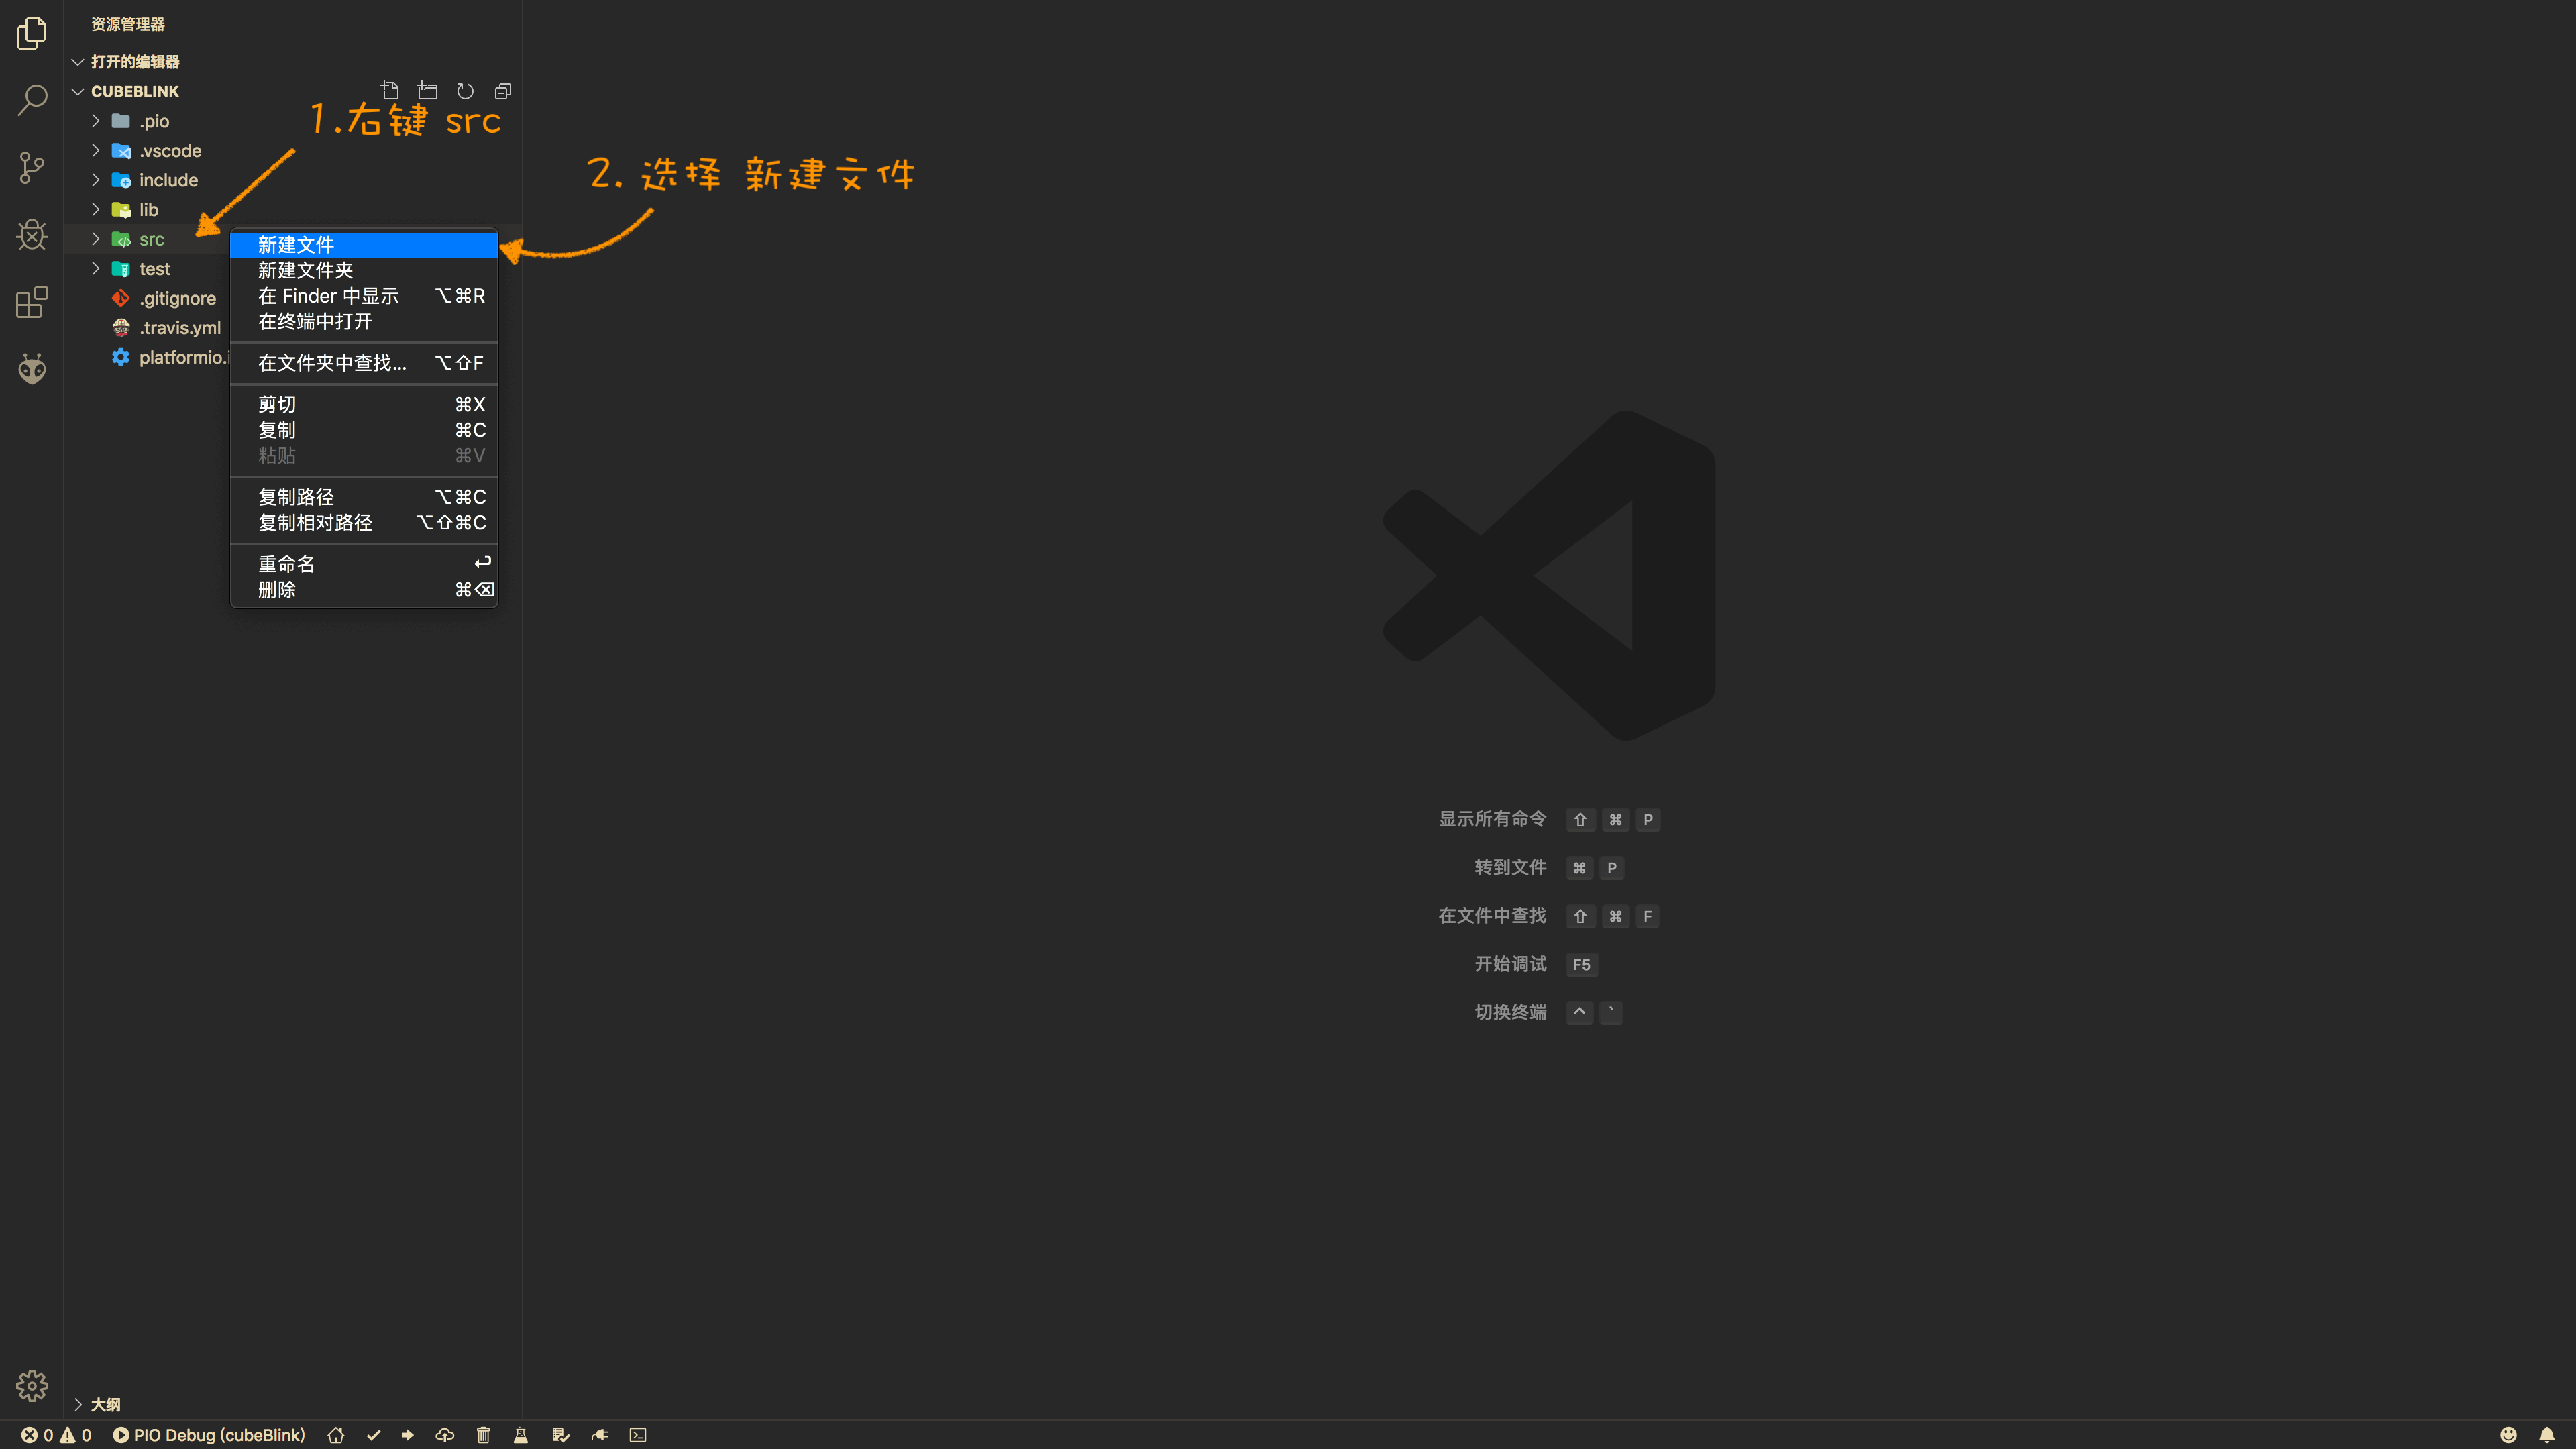
右键 src 文件夹,新建两个文件,一个是 main.h 另一个是 main.c:
向 mian.h 中添加以下代码,如果您的板载 LED 连接到其它管脚,请相应修改关于 LED 的三个宏定义:
#ifndef MAIN_H
#define MAIN_H

#include "stm32f1xx_hal.h"

#define LED_PIN GPIO_PIN_13
#define LED_GPIO_PORT GPIOC
#define LED_GPIO_CLK_ENABLE() __HAL_RCC_GPIOC_CLK_ENABLE()

#endif  // MAIN_H
向 mian.c 中添加以下代码:
#include "main.h"

void LED_Init(void);

int main(void) {
  HAL_Init();
  LED_Init();

  while (1) {
    // LED 翻转
    HAL_GPIO_TogglePin(LED_GPIO_PORT, LED_PIN);
    HAL_Delay(1000);
  }
}

void LED_Init(void) {
  // LED GPIO 初始化
  LED_GPIO_CLK_ENABLE();
  GPIO_InitTypeDef GPIO_InitStruct;
  GPIO_InitStruct.Pin = LED_PIN;
  GPIO_InitStruct.Mode = GPIO_MODE_OUTPUT_PP;
  GPIO_InitStruct.Pull = GPIO_PULLUP;
  GPIO_InitStruct.Speed = GPIO_SPEED_FREQ_HIGH;
  HAL_GPIO_Init(LED_GPIO_PORT, &GPIO_InitStruct);
}

void SysTick_Handler(void) { HAL_IncTick(); }
确保把 stm32f103c8t6 的最小系统板通过 stlink 连接到电脑 usb,编译并上传程序:
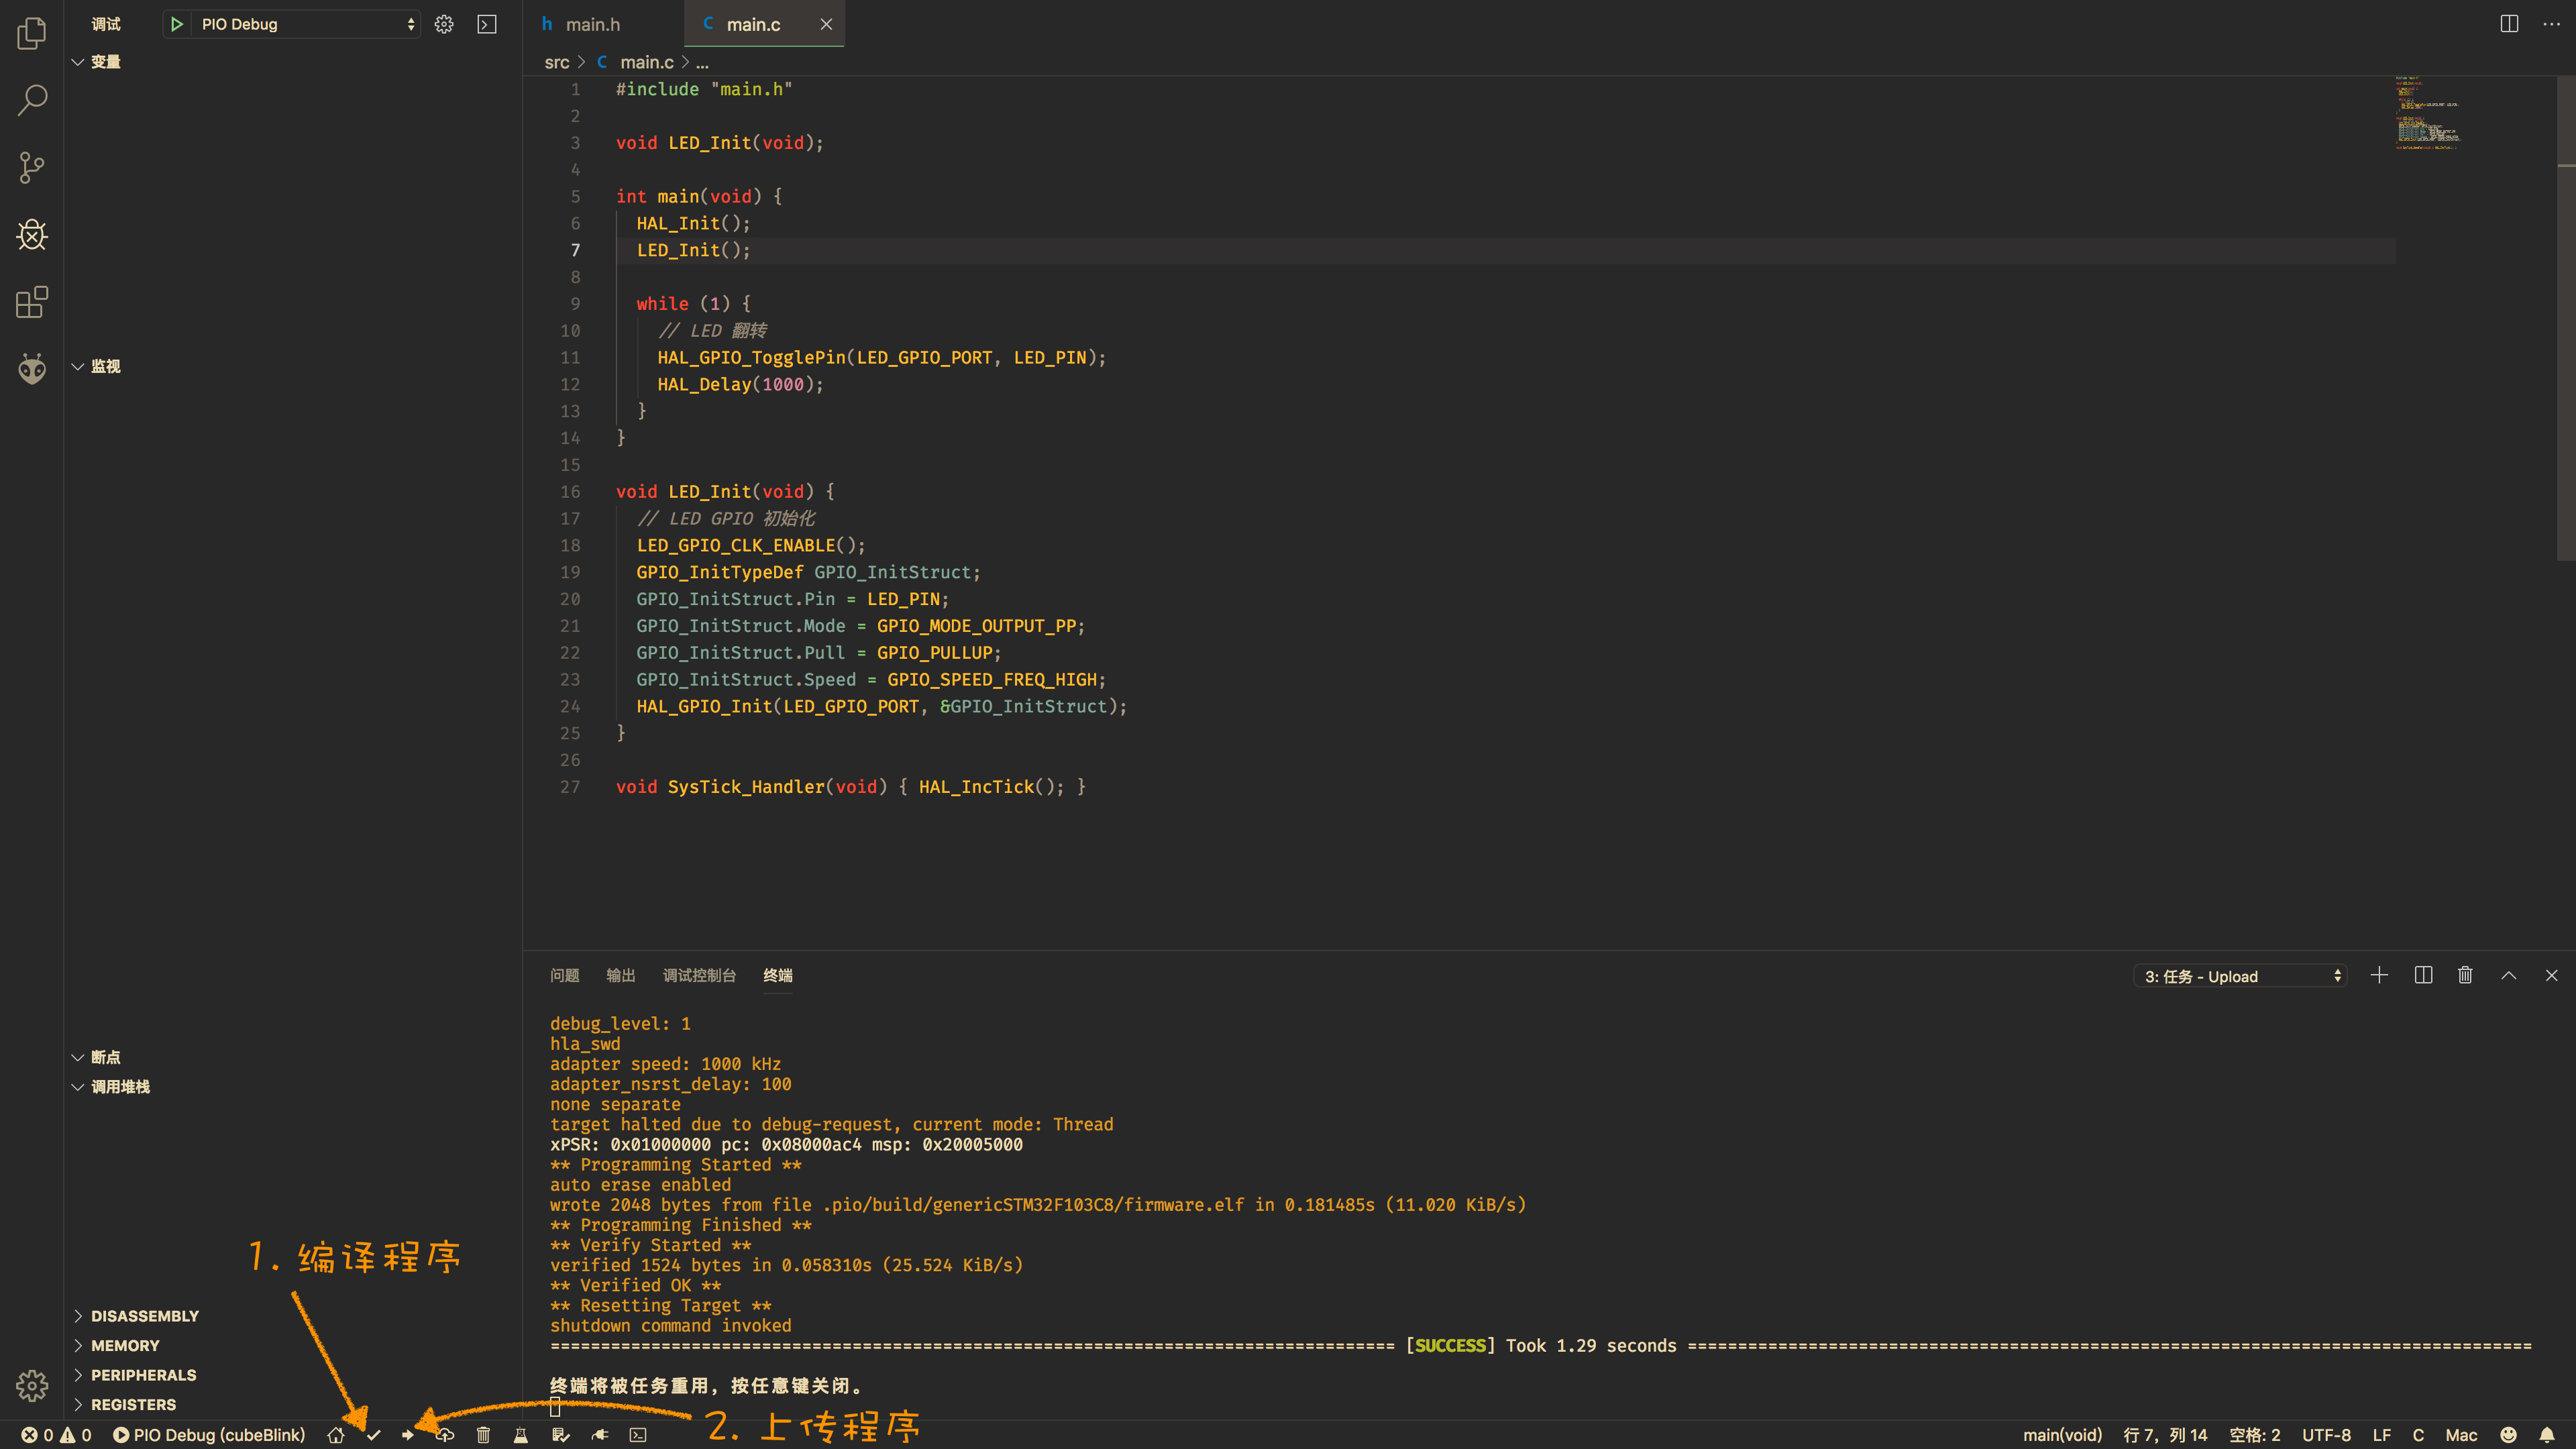
what? LED 竟然没有如期的闪动起来!
解决问题
代码都正确呀,为什么程序没有正常工作呢?首先怀疑对象是系统时钟,用示波器测试了一下芯片的高速晶振管脚,竟然没有起振,哎呀,我们确实没有添加系统时钟配置的代码,再次对照一下用 STMCubeMX^[STM32CubeMX is a graphical tool that allows a very easy configuration of STM32 microcontrollers and microprocessors, as well as the generation of the corresponding initialization C code for the Arm® Cortex®-M core or a partial Linux® Device Tree for Arm® Cortex®-A core), through a step-by-step process.——STM32CubeMX] 生成的普通项目的源码,确实我们的工程中缺少了对于时钟的配置。
为了解决这个问题,参考了 STMCubeMX 项目,笔者建议除了添加时钟的配置之外,还要加一些可能以后会用到的处理函数。这里我们添加两个新的文件 sys_basic.h 和 sys_basic.c。
文件 sys_basic.h 内容如下:
#ifndef SYS_BASIC_H
#define SYS_BASIC_H

void _Error_Handler(char*, int);
#define Error_Handler() _Error_Handler(__FILE__, __LINE__)

void SystemClock_Config(void);

#endif
文件 sys_basic.c 内容如下:
#include "sys_basic.h"
#include "stm32f1xx_hal.h"

/** System Clock Configuration
 */
void SystemClock_Config(void) {
  RCC_OscInitTypeDef RCC_OscInitStruct;
  RCC_ClkInitTypeDef RCC_ClkInitStruct;

  /**Initializes the CPU, AHB and APB busses clocks
   */
  RCC_OscInitStruct.OscillatorType = RCC_OSCILLATORTYPE_HSE;
  RCC_OscInitStruct.HSEState = RCC_HSE_ON;
  RCC_OscInitStruct.HSEPredivValue = RCC_HSE_PREDIV_DIV1;
  RCC_OscInitStruct.HSIState = RCC_HSI_ON;
  RCC_OscInitStruct.PLL.PLLState = RCC_PLL_ON;
  RCC_OscInitStruct.PLL.PLLSource = RCC_PLLSOURCE_HSE;
  RCC_OscInitStruct.PLL.PLLMUL = RCC_PLL_MUL9;
  if (HAL_RCC_OscConfig(&RCC_OscInitStruct) != HAL_OK) {
    _Error_Handler(__FILE__, __LINE__);
  }

  /**Initializes the CPU, AHB and APB busses clocks
   */
  RCC_ClkInitStruct.ClockType = RCC_CLOCKTYPE_HCLK | RCC_CLOCKTYPE_SYSCLK |
                                RCC_CLOCKTYPE_PCLK1 | RCC_CLOCKTYPE_PCLK2;
  RCC_ClkInitStruct.SYSCLKSource = RCC_SYSCLKSOURCE_PLLCLK;
  RCC_ClkInitStruct.AHBCLKDivider = RCC_SYSCLK_DIV1;
  RCC_ClkInitStruct.APB1CLKDivider = RCC_HCLK_DIV2;
  RCC_ClkInitStruct.APB2CLKDivider = RCC_HCLK_DIV1;

  if (HAL_RCC_ClockConfig(&RCC_ClkInitStruct, FLASH_LATENCY_2) != HAL_OK) {
    _Error_Handler(__FILE__, __LINE__);
  }

  /**Configure the Systick interrupt time
   */
  HAL_SYSTICK_Config(HAL_RCC_GetHCLKFreq() / 1000);

  /**Configure the Systick
   */
  HAL_SYSTICK_CLKSourceConfig(SYSTICK_CLKSOURCE_HCLK);

  /* SysTick_IRQn interrupt configuration */
  HAL_NVIC_SetPriority(SysTick_IRQn, 0, 0);
}

/**
 * @brief  This function is executed in case of error occurrence.
 * @param  None
 * @retval None
 */
void _Error_Handler(char* file, int line) {
  /* USER CODE BEGIN Error_Handler_Debug */
  /* User can add his own implementation to report the HAL error return state */
  while (1) {
  }
  /* USER CODE END Error_Handler_Debug */
}

void NMI_Handler(void) {}

void HardFault_Handler(void) {
  while (1) {
  }
}

void MemManage_Handler(void) {
  while (1) {
  }
}

void BusFault_Handler(void) {
  while (1) {
  }
}

void UsageFault_Handler(void) {
  while (1) {
  }
}

void SVC_Handler(void) {}

void DebugMon_Handler(void) {}

void PendSV_Handler(void) {}
时钟初始化在函数 SystemClock_Config 中实现,这里时钟源选择使用 8M 高速晶振、9倍频等等常用的时钟配置,在 main.c 中包含头文件 sys_basic.h 并在主函数 HAL_Init(); 后加入时钟初始化函数调用 SystemClock_Config();。
此时编译上传程序,可以看到 LED 如期灵动了起来!
调试程序
调试程序与使用 Arduino 框架时一致,需要在配置文件中指定调试工具,这里使用的是 stlink ,所以 paltformio.ini 的内容如下:
[env:genericSTM32F103C8]
platform = ststm32
board = genericSTM32F103C8
framework = stm32cube
debug_tool = stlink
点击 F5 按键便可以进行程序调试了!
总结
本文简单讲解了创建 stm32cube 框架的 PIO 工程的过程、遇到的问题及解决方法,希望对初次使用 PIO 开发 stm32cube 项目的同学有所帮助!