Apple平台开发-第三方库管理工具CocoaPods的安装和使用
今天了解macOS的串口编程,偶然了解到第三方库ORSSerialPort库,继而了解到了第三方库的管理工具CocoaPods,貌似这有助于在以后进行apple平台(iOS、watchOS、tvOS和macOS)开发,索性就安装一下吧。
什么是CocoaPods
CocoaPods官网中是这样描述的:
CocoaPods is a dependency manager for Swift and Objective-C Cocoa projects. It has over eighteen thousand libraries and can help you scale your projects elegantly.
所以它可以帮助我们有效管理Swift和Objective-C项目中使用的第三方库,所以非常有必要安装和使用,哈哈。
安装
CocoaPods官网还告诉我们:
CocoaPods is built with Ruby and is installable with the default Ruby available on OS X. We recommend you use the default ruby.
CocoaPods由Ruby实现,因为macOS中默认安装了Ruby,可以用其gem工具进行安装,在国内你懂的,gem使用的源只可远观,所以要替换成国内的源,我在Fedora下安装Jekyll一文中有描述,可以参考。
更换为**https://ruby.taobao.org/**的源后,那么我们可以通过以下命令安装CocoaPods:
$ sudo gem install cocoapods
安装成功后,我们就可以使用命令pod来使用CocoaPods了。
初始化
安装完成后,还需要初始化一下,执行命令:
$ pod setup
其实初始化的操作会先git clone在github上的CocoaPods源,可是在国内,你依旧懂得,都是泪,太慢了,甚至会出现下面的错误:
$ pod setup
Setting up CocoaPods master repo
[!] /usr/bin/git clone https://github.com/CocoaPods/Specs.git master

Cloning into 'master'...
error: RPC failed; curl 56 SSLRead() return error -36
fatal: The remote end hung up unexpectedly
fatal: early EOF
fatal: index-pack failed
那怎么办?只好咱自己用命令clone,然后再用pod setup命令进行初始化配置了,setup默认操作是将源clone到目录~/.cocoapods/repos目录下,所以先进此目录进行git clone操作:
$ cd ~/.cocoapods/repos
$ git clone [email protected]:CocoaPods/Specs.git master
做好心理准备,镜像很大而且速度很慢,完成后执行pod setup:
$ pod setup
Setting up CocoaPods master repo
  $ /usr/bin/git pull --ff-only
  From https://github.com/CocoaPods/Specs
     231c12b..1e7a611  master     -> origin/master
  Updating 231c12b..1e7a611
  Fast-forward
   .../ADMozaicCollectionViewLayout.podspec.json      |  23 +++++
   .../0.2/ASJGooglePlaces.podspec.json               |  22 +++++
   .../AXPopoverView/0.5.3/AXPopoverView.podspec.json |  39 ++++++++
   Specs/Adjust/4.7.1/Adjust.podspec.json             |  69 ++++++++++++++
   Specs/Agrume/2.5.1/Agrume.podspec.json             |  26 ++++++
	.
	.
	.
   Specs/eeGeo/1.0.635/eeGeo.podspec.json             |  56 +++++++++++
   Specs/eeGeo/1.0.636/eeGeo.podspec.json             |  56 +++++++++++
   .../0.0.1/ios-swift-utils.podspec.json             |  22 +++++
   71 files changed, 2200 insertions(+), 1 deletion(-)
   create mode 100644 Specs/JeraUtils/0.3.2/JeraUtils.podspec.json
   create mode 100644 Specs/KCBannerView/0.0.2/KCBannerView.podspec.json
   create mode 100644 Specs/KDCircularProgress/1.5.0-beta1/KDCircularProgress.podspec.json
   create mode 100644 Specs/KPPopView/0.0.6/KPPopView.podspec.json
	.
	.
	.
   create mode 100644 Specs/eeGeo/1.0.635/eeGeo.podspec.json
   create mode 100644 Specs/eeGeo/1.0.636/eeGeo.podspec.json
   create mode 100644 Specs/ios-swift-utils/0.0.1/ios-swift-utils.podspec.json
Setup completed
会出现类似上面的初始化信息,主要是git pull,然后创建一些文件,下面我们就可以使用pod管理向我们工程中添加第三方库了。
使用
我已经创建了一个Xcode的macOS工程SerialPlot,需要用到第三方库ORSSerialPort,那么跟着我开始吧。
首先进入Xcode工程的目录,可以先查看目录中的内容:
$ cd ~/Documents/workspace/OSX/SerialPlot/
$ ls -l
total 0
drwxr-xr-x  7 smslit  staff  238 Jun 20 17:25 SerialPlot
drwxr-xr-x  5 smslit  staff  170 Jun 21 08:40 SerialPlot.xcodeproj
drwxr-xr-x  3 smslit  staff  102 Jun 21 08:40 SerialPlot.xcworkspace
drwxr-xr-x  4 smslit  staff  136 Jun 20 17:25 SerialPlotTests
drwxr-xr-x  4 smslit  staff  136 Jun 20 17:25 SerialPlotUITests
然后初始化pod文件,再查看目录下文件,会发现增加了一个podfile:
$ pod init
$ ls -l
total 8
-rw-r--r--  1 smslit  staff  427 Jun 21 09:29 Podfile
drwxr-xr-x  7 smslit  staff  238 Jun 20 17:25 SerialPlot
drwxr-xr-x  5 smslit  staff  170 Jun 21 08:40 SerialPlot.xcodeproj
drwxr-xr-x  3 smslit  staff  102 Jun 21 08:40 SerialPlot.xcworkspace
drwxr-xr-x  4 smslit  staff  136 Jun 20 17:25 SerialPlotTests
drwxr-xr-x  4 smslit  staff  136 Jun 20 17:25 SerialPlotUITests
编辑podfile,增加我们需要的第三方库信息,一般可以在第三方库的github网站找到相关使用cocoapods安装库的信息,比如我使用的ORSSerialPort的安装指导页面:
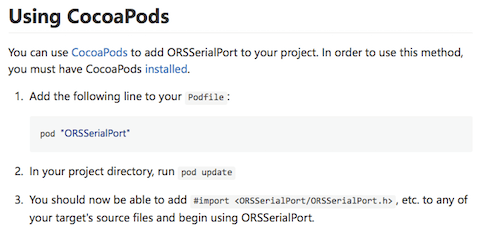
按照指导用vim编辑Podfile,添加一行内容——pod ORSSerialPort:
$ vim Podfile
添加后文件内容如下:
# Uncomment this line to define a global platform for your project
# platform :ios, '9.0'

pod "ORSSerialPort"

target 'SerialPlot' do
  # Comment this line if you're not using Swift and don't want to use dynamic frameworks
  use_frameworks!

  # Pods for SerialPlot

  target 'SerialPlotTests' do
    inherit! :search_paths
    # Pods for testing
  end

  target 'SerialPlotUITests' do
    inherit! :search_paths
    # Pods for testing
  end

end
然后,我们就可以用pod安装ORSSerialPort库了:
$ pod install
Analyzing dependencies
Downloading dependencies
Installing ORSSerialPort (2.0.2)
Generating Pods project
Integrating client project
Sending stats
Pod installation complete! There is 1 dependency from the Podfile and 1 total pod installed.
然后可以查看一下目录下文件,会发现多了一个文件夹和文件:
$ ls -l
total 16
-rw-r--r--  1 smslit  staff  448 Jun 21 12:20 Podfile
-rw-r--r--  1 smslit  staff  218 Jun 21 12:23 Podfile.lock
drwxr-xr-x  8 smslit  staff  272 Jun 21 12:23 Pods
drwxr-xr-x  7 smslit  staff  238 Jun 20 17:25 SerialPlot
drwxr-xr-x  5 smslit  staff  170 Jun 21 08:40 SerialPlot.xcodeproj
drwxr-xr-x  3 smslit  staff  102 Jun 21 08:40 SerialPlot.xcworkspace
drwxr-xr-x  4 smslit  staff  136 Jun 20 17:25 SerialPlotTests
drwxr-xr-x  4 smslit  staff  136 Jun 20 17:25 SerialPlotUITests
然后我们打开自己的工程,就可以在源代码中添加库(#import <ORSSerialPort/ORSSerialPort.h>)就可以调用库的api了:
$ open SerialPlot.xcworkspace